Showing posts with label Life. Show all posts

Wednesday, 7 May 2014

Gluten, dairy and sugar free recipe ideas

I'm a bit off topic today - but I figure this blog is about how I make my life work for me and my little people, so I thought it was worth sharing anyway! About 2 weeks ago we started our 5 1/2 year old on a gluten, dairy and sugar free elimination diet. His behaviour at school had become so difficult that we had made the decision to start him in a new school to give him a fresh start. And a few days prior to the new school term, and on advice from my husband's sister, who had tried my nephew on a similar elimination diet with great success, we made the decision to give it a go. And I cannot tell you the difference this diet has made! He's like a different person and life is so much less stressful.

So today I thought I would share a few recipes I've made up in the last few weeks to try and adapt some of my son's old favourites (e.g. ice cream for dessert!). Even if your kids don't have the same kinds of issues that my son was having - you may like to try these recipes anyway. Trust me they are really tasty, the kids love them (and my kids are very picky eaters!)- and really healthy as well!

Passionfruit and coconut "ice cream" tubs

My son loves to have an ice-cream after dinner, but this is obviously not possible anymore. So I made him these passionfruit, coconut milk, chia and agave "ice cream" tubs in left over yoghurt containers I had saved (that even came little individual spoons) - and they were a HIT.

1. Mix 1/2 cup of chia in a tin of coconut milk and leave to soak over night.
2. The next morning, mix in the juice of about 5-6 passionfruits (I passed through a sieve as my son hates the site of any kind of pip but leave yours in if you want), about 3-4 tablespoons of agave (to taste) and a bit of sugar free vanilla extract if you want.
3. Give it all a good mix, spoon into little tubs and put some of your favourite fresh fruit on top.
4. Put into freezer. You can eat them after a few hours for a softer mix - otherwise they freeze very solid and sometimes the kids need help spooning it out (mine didn't mind).

These were a serious hit in my house!


Healthy apple crumble

There's not a hint of any of the usual unhealthy ingredients in this crumble and it tasted really, really good. 

1. Peal and chop about 10 granny smith apples. Mix in about a teaspoon of ground cinnamon, some agave and some freshly ground nutmeg - or whatever spices you like to cook apples with (e.g. cloves if you like them - personally not my favourite). Mix in some sultanas if you want - I didn't do this. 
2. Cook for about 15 minutes on a low heat until the apples are soft, but still have some texture. 
3. Prepare the crumble by mixing together about a cup of almond meal, a cup of brown rice flour, some chopped cashews (about 1/2 cup), a few tablespoons of agave and a few tablespoons of coconut oil. Rub together like you would a normal crumble until the mix makes a breadcrumb type consistency. Use more wet ingredients if it's still a bit dry. 
4. Place apples on the bottom of a baking dish and cover with the crumble mix. Bake for about 20 minutes or until the crumble topping goes brown and a bit crispy. 

This was so tasty and even though the boys (hubby included) all asked what ice-cream/custard we had to serve it with (um - that would be none!) - they still ate nearly all the crumble in one sitting! 


Chilli and lime roasted cashews

1. Mix a few cups of raw, unsalted cashews in a bowl with a few teaspoons of chilli powder (or more if you like them hot and less if you are serving to the kids), a few tablespoons of agave, the juice of one lime, a tablespoon of salt and a tablespoon of olive oil.
2. Place in a hot oven (about 200 degrees) for about 15-20 minutes. Make sure to turn them every 5 minutes or so - otherwise they will burn. And keep a really close eye on them! You are waiting for all the wet ingredients to dry out and the nuts to go crispy. (Note that while the nuts are hot they will be soft and won't crisp up until they have cooled down).
3. Remove from oven, mix in a bit more salt if you want, let them cool then place in an airtight container. They should last a week or more - but the family loved these so much ours were gone by the second day!!


Would love to hear from you if you make any of these. Get in touch by commenting below or on facebook/twitter.

Have a lovely day! x

Tuesday, 25 March 2014

Homemade Easter gifts | DIY bag toppers

It's only 3 weeks or so until Easter (seriously, where is this year going!) and I have been super organised and already made up gifts for the boys' teachers and school friends. I was really happy with the end result and decided to share it with you - along with a free copy of the template I used to create these bag toppers.

Read on for instructions and the link to the free printable.


Here's how to create these easy, affordable gifts that everyone will love!

1. Download your FREE printable (here)

2. You will then need:
  • a printer to print off your bag toppers 
  • small 10cm x 15cm snap lock bags (make sure you get the brand without branding on the bag itself)
  • plenty of small Easter eggs
  • scissors - or a paper guillotine for a cleaner finish
  • a stapler 


3. Print out your bag toppers as many times as you want and cut them out
4. Fill your snap lock bags with Easter eggs (I put 6 eggs in each bag)
5. Close up the bags, fold the bag toppers in half and staple them.


6. Voila! Perfect gifts for the kids' school friends, the teachers, your work colleagues, party favours - you name it!


Let me know if you make one of these, I would love to see the finished product! And don't forget to follow me or sign up to the blog if you like more of this kind of inspiration sent straight to your inbox! x

Wednesday, 12 March 2014

Style on a budget | 12 stunning table settings

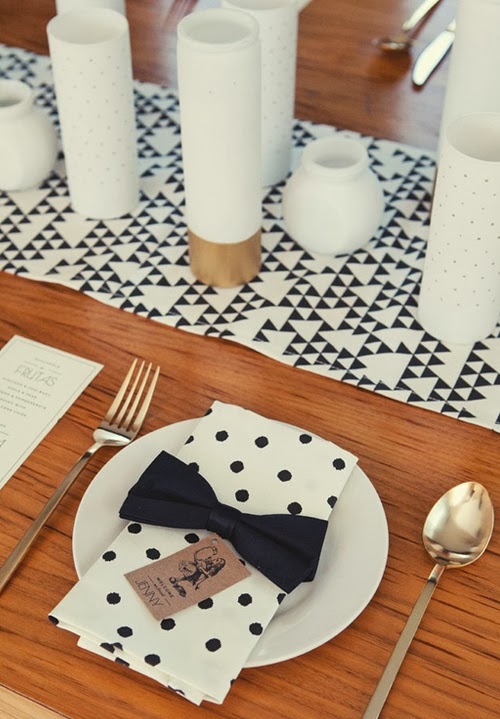
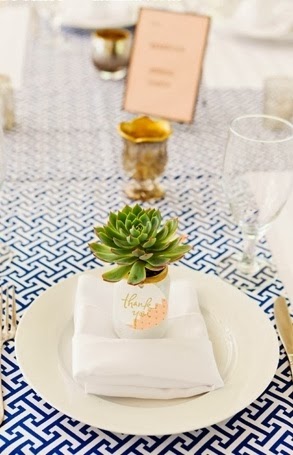
At the moment finances are tight and I've had to put a hold on furniture and accessory purchases - at least for a couple of weeks :) But just because you're on a budget doesn't mean life can't still have style. There is nothing better than a beautifully set table to put a smile on guests faces and today I'm bringing you 12 ideas for how to set a table that will do just that. Most of these table settings use things you would already have around the home, or involve quick and easy DIY projects that you can whip up in an afternoon.

So put down that credit card and have a look around your home and garden for props that can be used to set a diving table for your next dinner party.

1
2
3

6

7

8

9

If you enjoyed this post, don't forget to subscribe to the blog to receive regular inspiration direct to your inbox! 

Have a lovely day! x

Tuesday, 11 March 2014

Interior styling | My favourite IKEA hacks

A few weeks ago I did a post on how to upgrade the IKEA Besta storage unit (read it here) and it proved to be very popular! So today I thought I would bring you some more IKEA hack inspiration. 

I'm the only one in my family who likes to visit IKEA and my husband really objects to the flat packs (actually I would go so far as to say hates them) - so I sometimes sneak out there while the kids are at school just to walk around and take in the ideas - and I often have to assemble the stuff myself. I always love a bit of IKEA inspiration and there are some super creative people out there doing some pretty awesome things - so today I'm bringing you 15 of my favourite IKEA hacks. 

First is this IKEA Malm bedframe, which has been added to with some stick on wood. I'm not sure if it would look quite as good in person as it doesn't in this picture, but it has a pretty effective look here. Perfectly styled with a Pia Wallen blanket (look alike I think?). You can read all about the Pia Wallen Crux blanket here. 

1

Next are these coffee table hacks with concrete tops. These are pretty serious DIY projects that involve casting concrete and making casting moulds out of timber etc. - way beyond my skills that's for sure. But they look pretty great if you have a handy person around you who could help with this. 
2
3

More in keeping with my DIY abilities would be this marble coffee table using the Klubbo. Would you believe this has been done using marble adhesive paper. Again, not sure if it would have the same effect in person, but it has a pretty great effect in these pictures. 
4

Next is the PS metal cabinets. These have been an IKEA classic over the past few years, and although I own two of them, I'm getting a bit sick of them. But how good do they look painted matte black with a wood top? I am seriously tempted to try this with ours and see if I can bring some new life to them. 
5

Or a different idea for the PS cabinets. 
6

And what about these ideas for the kids? First the Malm drawers with adhesive wall dots. I love the look of these and these are a really cheap way of bringing some fun to your child's room. 
7

Or how about this dolls house made from very inexpensive Lack shelves?
8

Next is this little person's desk made from Linnmon table top and Frosta legs. Really clever and cheered up with the bright wall paper and mini Panton chair. You could even take this a step further and paint the legs in a bright colour. 
9

A painted blind and step ladder, both from IKEA

The Vikare bed frame - turned Jeep - complete with custom number plates! My son would just love this! A definite thought for my littlest bub who will soon be moving from his cot. 

Or how about cutting out a cute cloud shape from an inexpensive IKEA doormat?

And the final idea are these pendants hung from IKEA shelf brackets. This is a great idea for renters who might want to hang a pendant light, or for people who don't want to spend money on electricians to get a pendant hung. They also make really modern looking wall fittings, which can often be tricky to find. 


I hope you've enjoyed today's IKEA inspiration. If you enjoyed this, don't forget to subscribe to the blog for daily inspiration to your inbox. 

Have a great day! x

Saturday, 1 March 2014

Top 5


First favourite of the week is this chicken bruschetta - my most favourite lunch at the moment. To make it: a slice of spelt/rye toast, left over poached chicken with celery, dill, parsley, chives, a bit of low fat mayo, a squeeze of lime juice and salt and pepper. It's the best, seriously. And healthy too! 


A wardrobe staple for me at the moment, especially as the weather starts to get cooler. This one can be found at She Piner, which has free worldwide shipping (here).


This is the living room of Katerina from the amazing blog OnlyDecoLove. Not only do I love everything about this room, but everything about her blog...check it out. 


Who doesn't love receiving a beautifully wrapped gift. I stumbled across this picture on Pinterest this week (courtesy of Fácil y Sencillo) and it's got me thinking about a new feature I might start on the blog. Stay tuned for that!


There's nothing like a trip out to Koskela to get the creativity flowing. Today I had a tasty lunch at Kitchen by Mike with some of my oldest friends, one who I hadn't seen for over three years. It was lovely to catch up and chat. I had the best pumpkin and feta bruschetta that I've decided to recreate for dinner this week, so will post that recipe when I've made it, as it was to die for! After lunch we went for a wander around Koskela where I spotted these adorable wooden artworks by Me and Amber. Full of fun and fluro, they are now definitely on my wish list!

Have a wonderful weekend. xx


Wednesday, 26 February 2014

4 affordable outdoor updates with huge impact

It's often the last place people think of during a renovation and it can easily be forgotten, especially if you're low on budget. But the outdoor areas of your home can create a huge impact and most of us spend so much time outside during summer months that it's worth spending some time making the space work for you and your family. Today I'm bringing you some affordable updates with big impact, and the best thing is most of these projects can be done this weekend!

1. Paint or build a chalkboard

It's no secret that I love a chalkboard. I did a full post about this a few weeks ago (here) but this focused largely on indoor ideas. Given the mess that chalkboard dust can create (although look out for dustless chalk on the market), an outdoor chalkboard is a great idea for a mess free, creative environment that will entertain the kids for ages.

Outside chalkboard play area inspiration
Source

Or great to keep the little people entertained at a kids party (a full tutorial on how to create this DIY beauty can be found here)


It's also a great place to write notes to adult party guests as well, like I did recently at a baby shower I hosted for my sister.

Source

Admittedly these next few don't fall in to the weekend project category but I couldn't resist including them. How much would the kids love these - and on top of that they look amazing and in keeping with the modern aesthetic of the houses.

 
Source


Source

To make your own chalkboard, take a section of a wall, spray paint an old vintage frame and add some board with chalkboard paint, or even paint one of the columns of your house, like I did at my house. Just include one somewhere for a dramatic outdoor update!


2. Style a beautiful outdoor table setting

My next tip for an easy and affordable outdoor update is to create a beautifully styled table. This is a really inexpensive way of bringing life to your outdoor space and looks so inviting for a dinner party - or even just for family dinner.


For the summer!
Source

It doesn't have to cost a lot - some simple rustic furniture decorated with flowers and candles looks amazing. Bring in some colour with bright chairs or stools (or even paint or spray paint your own in your favourite bright colour!).

Love this! Clair Olivia Wayman Interior Stylist. Need to get me a Frangipani tree..
Source

two-toned table -- would be cute for separate bride & groom's sides at engagement party or rehearsal dinner
Source

well-tailored---reminds me of a Southern gentleman in a seersucker suit [more at pinterest.com/eventsbygab]

Or hang some inexpensive lanterns with candles inside, so pretty. 

table set designed by patricia urquiola for kartell | stylist helle walsted | elle decor italia 2010
Source

Mid-Century Modern Dinner Party
Source

And how cute is this chalkboard table runner? Think of all the possibilities for something like this - draw on the place settings with an outline of the knife and fork spots, write guest's names, write the menu down the middle, write some conversation starting questions for dinner parties with people who don't know each other, give kids some chalk and let them draw on it while they wait for their meal, the list of possibilities is endless!

Go to the source of this photo below for the DIY tips on how to make one of these yourself. I'll definitely be doing one of these for my next dinner party!

Source

3. Put together some great planters with hardy plants

Plants that require little or not water (or better still artificial ones that look as good as the real thing) are perfect for people who don't have green thumbs (like me!). Succulents, for example, are really modern looking plants that, in a lovely planter box can dramatically transform the look of your outdoor space without the need for major work. Planters are a perfect option for all outdoor areas, including small terraces and even to bring greenery and life to an otherwise dull balcony.

Source

Love this: ++  Bench Planter  ++! Build the top and use two sturdy, over-sized pots for the base - so simple.  This would look really good on the end of my deck..... Directions here .....
Source

Horsetail grass in modern planters..Fabulous idea for a privacy screen.. a little like bamboo!!

Moderne strakke zwarte schutting met exclusieve verlichting en moderne bloembakken


Cool #DIY HomeMade-Modern.com concrete planter with spigot. @Ben Silbermann Uyeda shows how to make it from #repurposed cabinet.
Source

Summer Balcony Style - Making Over an Outdoor Space

4. Inexpensive lighting

Lighting can often be forgotten outside but with some clever tips you can light up your outdoor areas and make them usable for longer in the day. People often get put off outdoor lighting as it can be expensive to get an electrician to come and rig up the required waterproof equipment. But there are so many other options on the market these days that there is no excuse for not getting some light outside. The first ideas I've sourced below are solar powered. One warning with solar lighting (from personal experience!) is that unless you have an outside area that gets a seriously good dose of daily sunshine, they are unlikely to charge for long enough and therefore don't throw off enough light. We recently had to bin the solar lights we had bought for that reason, so I've had to come up with some other ideas instead (keep reading...)

Galvanized buckets + metal poles + string lights = portable garden lighting - For more innovative gardening tips, see book, Shamanic Gardening: Timeless Techniques for the Modern Sustainable Garden
Source

Backyard lighting along the southern-most fenceline.
Source

For those who don't have good sunshine (like me!) and are feeling crafty, I've also sourced some other amazing and effective DIY options that would be so beautiful. Follow the source links for instructions on how to make these. I personally love the paper bags.

Evenly spaced votive candles line a balcony for an outdoor garden wedding.
Source

Amazing idea for an outdoor wedding.

what a great idea to get lighting into different places...gardens, mantles or even flower arrangements!

Make solar garden lights!  Find a glass jar, paint the inside with Elmer glue tinted the color you want and then go to the DOLLAR TREE and buy a solar light.      Wala!  Outdoor lights for nearly nothing!

Rustic barn wood mason jar candle holder on Etsy, $35.00   Easy to make too. Would be easy to make. Cute with some barb wire added for a western look....

Add a beautiful fall glow to an outdoor area with these charming DIY terracotta votives! They make beautiful gifts too!

So I hope you've found some tips that will help you spruce up your outdoor area. Would love to know if you give any of these tips a try - or if you have any other ideas to contribute! Just let me know via FB or in the comments below.

Have a great day! x

Related Posts Plugin for WordPress, Blogger...